How to Disable and Enable Automatic Updates in Windows 11 / Windows 10 Permanently Using Group Policy & Registry Editor Settings
Group Policy Settings – Enable or Disable Windows Update Policies
You can also enable or disable the windows update policies using the Group Policy Settings. Open Group Policy to allow enable or disable updates and follow the process.
- Open the Run command, press Win Key + R
- Type gpedit.msc
- Click Ok or press Enter

When the Group Policy Editor opens, navigate to the following path to reach the required policy settings and select Configure Automatic Updates to make changes in Windows Update settings.
| Edit | Requirements | Description | Note |
|---|---|---|---|
| Policy Settings | Windows XP Professional Service Pack 1 or At least Windows 2000 Service Pack 3 Option 7 is only supported on servers of at least Windows Server 2016 edition. | Specifies whether this computer will receive security updates and other important downloads through the Windows automatic updating service | This Policy does not apply to Windows RT |
Computer Configuration>Administrative Templates > Windows Components>Windows Update>Manage End User Experience>Configure Automatic Updates
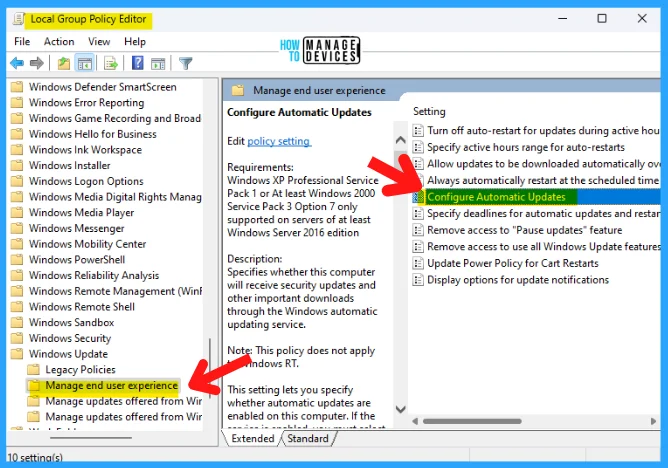
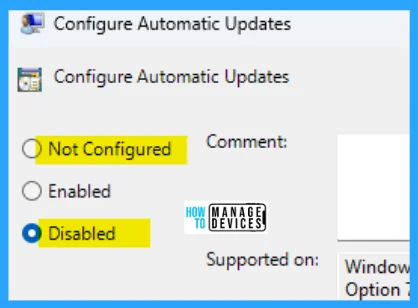
Double-click on Configure Automatic Updates and the configure automatic updates windows settings open, which default setting is “Not Configured“. Select Disable to stop Windows auto updates.
- Not Configured: The particular update policy is not configured on your computer
- Enabled: The particular update policy is configured on your computer
- Disabled: The particular update policy is disabled on your computer
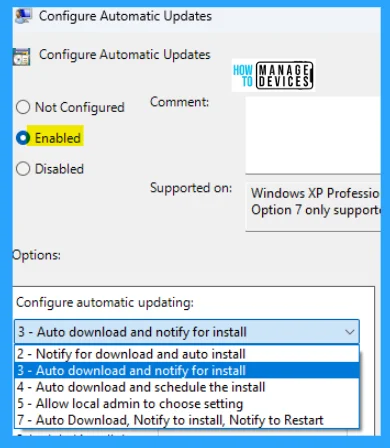
If you want to enable the Automatic Updates, then some options appear, as shown in the figure below. The five options are their specifications described in detail in the table.
This setting lets you specify whether automatic updates are enabled on this computer. If the service is enabled, you must select one of the five options in the Group Policy settings.
| Options | Descriptions |
|---|---|
| 2 – Notify before downloading and installing any updates | When Windows finds updates that apply to this computer, users will be notified that updates are ready to be downloaded. After going to Windows Update, users can download and install any available updates. |
| 3 – (Default setting) Download the updates automatically and notify when they are ready to be installed | Windows finds updates that apply to the computer and downloads them in the background (the user is not notified or interrupted during this process). When the downloads are complete, users will be notified that they are ready to install. After going to Windows Update, users can install them. |
| 4 – Automatically download updates and install them on the schedule specified | When “Automatic” is selected as the scheduled install time, Windows automatically checks, downloads, and installs updates. The device will reboot as per Windows default settings unless configured by group policy. (Applies to Windows 10, version 1809 and higher) Specify the schedule using the options in the Group Policy Setting. For version 1709 and above, there is an additional choice of limiting updating to a weekly, bi-weekly, or monthly occurrence. If no schedule is specified, the default schedule for all installations will be every day at 3:00 AM. If any updates require a restart to complete the installation, Windows will restart the computer automatically. (If a user is signed in to the computer when Windows is ready to restart, the user will be notified and given the option to delay the restart.) On Windows 8 and later, you can set updates to install during automatic maintenance instead of a specific schedule. Automatic maintenance will install updates when the computer is not in use and avoid doing so when the computer is running on battery power. If automatic maintenance is unable to install updates for 2 days, Windows Update will install updates right away. Users will then be notified about an upcoming restart, and that restart will only take place if there is no potential for accidental data loss. |
| 5 – Allow local administrators to select the configuration mode that Automatic Updates should notify and install updates. (This option has not been carried over to any Win 10 Versions) | With this option, local administrators will be allowed to use the Windows Update control panel to select a configuration option of their choice. Local administrators will not be allowed to disable the configuration for Automatic Updates. |
| 7 – Notify for installation and notify for restart. (Windows Server only) | With this option from Windows Server 2016, applicable only to Server SKU devices, local administrators will be allowed to use Windows Update to proceed with installations or reboots manually. If the status for this policy is set to Disabled, any updates that are available on Windows Update must be downloaded and installed manually. To do this, search for Windows Update using Start. If the status is not Configured, the use of Automatic Updates is not specified at the Group Policy level. However, an administrator can still configure Automatic Updates through Control Panel. |
Registry Editor Settings – Enable or Disable Windows Automatic Update
Now you can also change the settings from the registry editor settings to enable or disable the Windows update policies. To change the updated policy setting, follow the path below.
Computer\HKEY_LOCAL_MACHINE\SOFTWARE\Policies\Microsoft\Windows
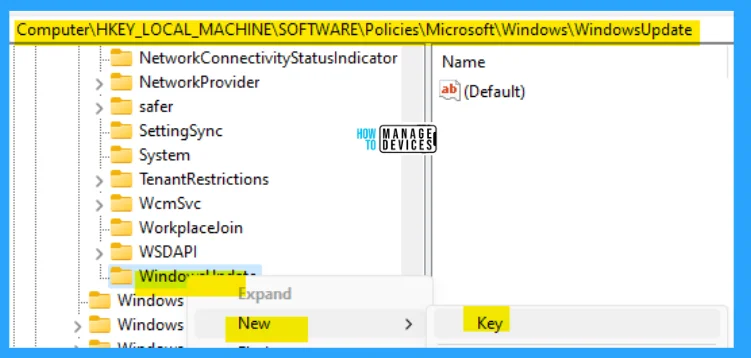
In the Windows folder, scroll down. If you do not find any folder like Windows Update, create one. The process of creating a new key is shown below:
- Right-click on the Windows folder, click on New
- Then click on Key
- Now named it as Windows Update

As you created the Windows update folder under the Windows folder, now create another key under the Windows update key, and repeat the above procedure.
- Right-click on Windows Update
- Select New, then Key
- Name it AU
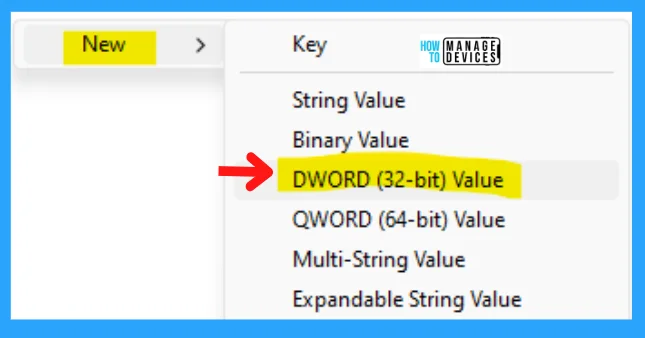
Click on the AU key that you created; it opens there is a default value available. It’s time to make a value under the AU key. The process of developing a value is represented below:
- Right-click on the Blank area of the AU key in the right panel
- Select New, then DWORD (32-bit) Value
- Named the DWORD Value as NoAutomaticUpdate
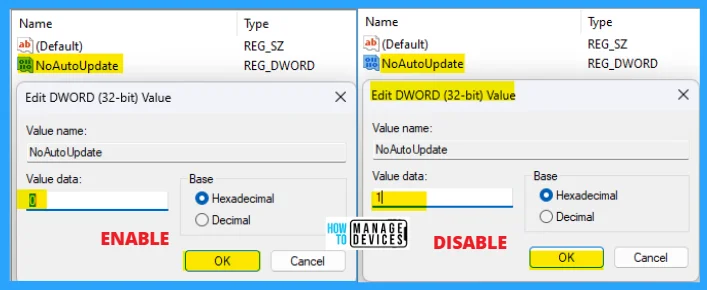
Double-click on the NoAutoUpdate REG_DWORD, and the Edit DWORD (32-bit) Value window appears. Here you can implement the value data 0 to enable Windows to update and value data 1 to disable Windows update.
NOTE! The system needs to be restarted after modifying both Group Policy settings and Registry Editor.
Comments
Post a Comment